


Final Result
Not many People know it, but the GoldSrc Engine has a great option to increase the looks of the game. Its like a predecessor of Bump Mapping and called Detail Textures. To enable these in any of the games using the GoldSrc Engine, e.g. Half-Life, Counter-Strike, Team Fortress Classic - just type r_detailtextures 1 into the ingame console.
But nearly no map is delivered with these textures, neither standard maps nor custommaps. In this tutorial I want to show you how to create these textures for any map you want so more and more maps can use this great feature.
But nearly no map is delivered with these textures, neither standard maps nor custommaps. In this tutorial I want to show you how to create these textures for any map you want so more and more maps can use this great feature.

Extract the textures used
First you have to choose a map, in this case I picked de_dust2 for Counter-Strike. No Detail Textures are linked to this map although it is a standard map.
To see what textures are used in the map you need the Object Viewer delivered with Crafty.
When installing Crafty you can link all .bsp files to the Object Viewer, so just doubleclick on de_dust2.bsp in your mapfolder C://Program Files/Steam/SteamApps/*username*/counter-strike/cstrike/maps/.
If de_dust2.bsp is not in said folder: open counter-strike.gfc with File System Browser(also installed with Crafty) in this folder:C://Program Files/Steam/SteamApps/, then go to /counter-strike/cstrike/maps/ and copy de_dust2.bsp into your maps folder.
Also copy cs_dust.wad and halflife.wad out of /counter-strike/cstrike/ inside counter-strike.gfc into your cstrike folder, you will need this later. (Or you can just download the files from here)

If this is your first time using Object Viewer and you want to know more about it, check the related tutorials on the right. For this tutorial we only need to know what textures are used by the map. To do this, just click on Help -> Console. A window will open up showing several lines of code. Here we can get the information we need:
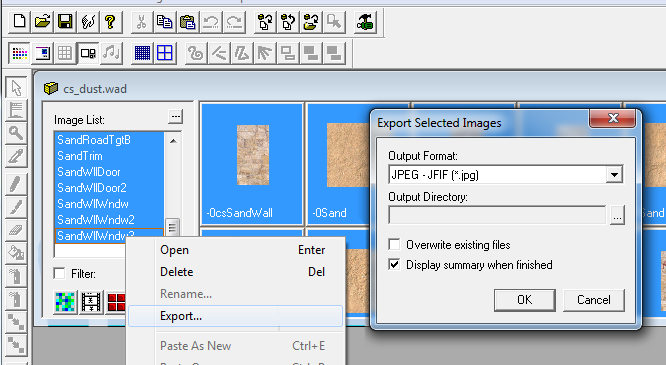
All used textures are listed as well. Now that you know where the textures are located you have to get them out of the .wad file, use Wally for that. Just open the .wad file with Wally and select all files in the image list by pressing shift while selecting, then right-click on them and select export -> set your output directory. You'll get a message listing all exported files.
(1) Code:
// Loading materials from WAD file halflife.wad...
// Loading materials from WAD file cs_dust.wad...
// Loading materials from WAD file halflife.wad...
// Loading materials from WAD file cs_dust.wad...
All used textures are listed as well. Now that you know where the textures are located you have to get them out of the .wad file, use Wally for that. Just open the .wad file with Wally and select all files in the image list by pressing shift while selecting, then right-click on them and select export -> set your output directory. You'll get a message listing all exported files.
Some textures are still missing, if you read the Object Viewer console carefully you should have read this:
To get these files you have to use another tool: BSP Viewer, the predecessor of Crafty. Again, open de_dust2.bsp with BSP Viewer and select File -> Export -> Bitmaps. Then select embedded and non-embedded textures. Now you should have all of the textures used in one folder.
To get these files you have to use another tool: BSP Viewer, the predecessor of Crafty. Again, open de_dust2.bsp with BSP Viewer and select File -> Export -> Bitmaps. Then select embedded and non-embedded textures. Now you should have all of the textures used in one folder.

Create your textures
Now that you have the images to use you can get creative. But first, you have to know how Detail Textures work: Detail Textures are images that are placed above the textures of the map, for example: If you have a papertexture you can place a pattern on top of it to create a better impression of paper.

Now, what does the Detail Texture have to look like?
Best solution would be: take the original texture, open in Photoshop/Gimp and create a new texture in a seperate layer that fits the original. But if you try to do it this way, you have a lot of work to do - e.g. de_dust2 has 41 different textures, so you have to create 41 Detail Textures.
Another way is to create tileable Detail Textures that can be used for several original textures, refering to de_dust2 most of the textures are sand/wall textures that can all use the same detail texture.
While creating these its important that all of these things apply:
- Textures have to be tileable, otherwise they dont fit when repeated and it looks weird
- Dimensions of the textures should be a multiple of 8 - 256*256 is a good size.
- Textures have to be black and white, otherwise the original texture gets colored (you can do that ofc)
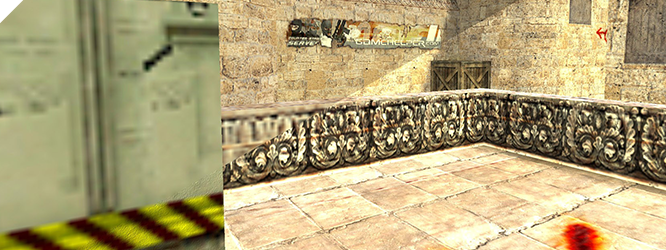
An example for a tileable texture is this one, used for stone floor in de_dust2(it is visible in the preview):

When all of this is done, save the textures as .tga (Targa) file and put them in your cstrike/gfx/detail/ folder. If this folder doesn't exist, create it.

Apply Detail Textures to maps
Ok, here's the tricky part.
To add the Detail Textures you have to create a .txt file named like the map you are creating it for. In this example the mapname is de_dust2.bsp, so the file is called de_dust2_detail.txt. This textfile has to be in the /maps/ folder, next to the original .bsp file.
In this file all textures and their correspondant Detail Textures get listed like this:
Code:
// -0csSandWall detail/wall2.02.0
// -0Sand detail/sand2.02.0
// -0SandRock detail/rock4.04.0
// -0csSandWall detail/wall2.02.0
// -0Sand detail/sand2.02.0
// -0SandRock detail/rock4.04.0
In this list the first item is the name of the original texture, the second item is the name of the Detail Texture - detail/ is the folder its located in, e.g. wall is the name of wall.tga, without extension.
Then height and width of the Detail Texture compared to the original texture.
If you created a Detail Texture on base of the original you can use 1.0 and 1.0 as they have the same size. Otherwise you have to either do the math after looking up the dimensions of the original and the Detail Texture or change the values and check what it looks like ingame.
That should be enough to know to start creating your own Detail Textures, you can download the project files to have a closer look and you can check out some of the Detail Textures I created myself by checking the related links.

Comments
Need additional help or want do give feedback?

Results
Finished this tutorial and want to submit your outcome?
The European languages are members of the same family. Their separate existence is a myth. For science, music, sport, etc, Europe uses the same vocabulary. The languages only differ in their grammar, their pronunciation and their most common words. Everyone realizes why a new common language would be desirable: one could refuse to pay expensive translators.
To achieve this, it would be necessary to have uniform grammar, pronunciation and more common words. If several languages coalesce, the grammar of the resulting language is more simple and regular than that of the individual languages. The new common language will be more simple and regular than the existing European languages.
It will be as simple as Occidental; in fact, it will be Occidental. To an English person, it will seem like simplified English, as a skeptical Cambridge friend of mine told me what Occidental is.
It will be as simple as Occidental; in fact, it will be Occidental. To an English person, it will seem like simplified English, as a skeptical Cambridge friend of mine told me what Occidental is.
Add Comment
submit
The European languages are members of the same family. Their separate existence is a myth. For science, music, sport, etc, Europe uses the same vocabulary. The languages only differ in their grammar, their pronunciation and their most common words.
The European languages are members of the same family. Their separate existence is a myth. For science, music, sport, etc, Europe uses the same vocabulary. The languages only differ in their grammar, their pronunciation and their most common words.
[aVe] Black
31.07.2012
31.07.2012
+
Add File
submit
Knowledge
required for this tutorial
?
Crafty
 Texturizing
 Patience

Crafty
Nothing but basics
Texturizing
You should know most stuff already
Patience
Expert knowledge required